By now many of you have probably read our blog post on the basics of setting up a PBN.
But one of the most common questions you guys have asked is…
“How do I setup the PBN SEO to make sure it isn’t labeled as spam and increases my SERPs?”
And that is a very valid one, which was not covered in-depth in the previous article.
If a PBN is built correctly, you can essentially DOMINATE any search term in Google but if done wrong, it will have the exact opposite effect.
In our previous article, we mentioned there were 3 steps to building a Private Blog network:
- Find expired domain
- Get Private Blog Network Hosting
- Build the site on domain
In this blog post, we will cover the third step (building the site) in more detail as well as add a fourth step:
- How to link to your money site
By this point..
..you should have followed our previous tutorial..
and..
have a high authority domain registered into your account and have the hosting set up already using the GoPBN’s interface.
Once that is done, you can continue to…
Building The Site On Your Network
The first step of setting up your website is to ensure that it would pass all Google spam checks.
“How do you do this?”
The answer is simple:
Make it look like a legitimate website..
High authority domains normally have many social signals and are regularly updated with high-quality content. Remember that the best way to hide your PBN is in plain sight. Your PBN is not an excuse for a half-hearted attempt at a blog. It should be helpful to its readers, and should command authority on the subject keywords.
“How do I make my website look like a legitimate high authority website?”
Now that’s a great question..
..and you can find the answer below!
Most people, when building their PBN sites, just put up a few spun articles and a free WordPress theme and expect it to pass Google’s quality checks.
This is the exact WRONG..
..the thing to do because authority websites have may HIGH QUALITY
- Articles
- Social Shares
- Images
- Outbound Links to other authority sites
- Comments (by readers, not just you)
- Nice Header.
Making your PBN look like a legitimate authority website can be summarized in the following steps:
- Create High-Quality Content
- Setup WordPress (or another CMS of your choice)
- Add content to website
- Social signals
Examples
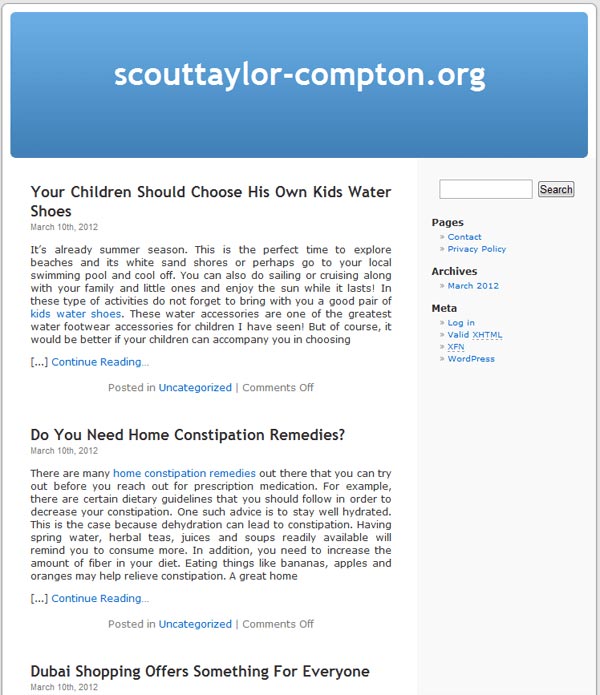
The picture above is an example of a BAD blog network.
“Why?” you may ask…
The answer is it obviously looks like a spam site regardless of the DA/PA/TF/CF it has.
- There are no images
- No header image
- Low quality articles
- No links to other authority sites
- No social share buttons
- Overall a bad layout
- No privacy policy or disclaimer
How many authority sites do you know uses a WordPress theme from 2010 and have no images what so ever?
The answer is NONE!
In order to make sure that Google sees your PBN as a high authority website..
..there must be some precautions that we take.
Take a look at the image below for an example of a GOOD PBN
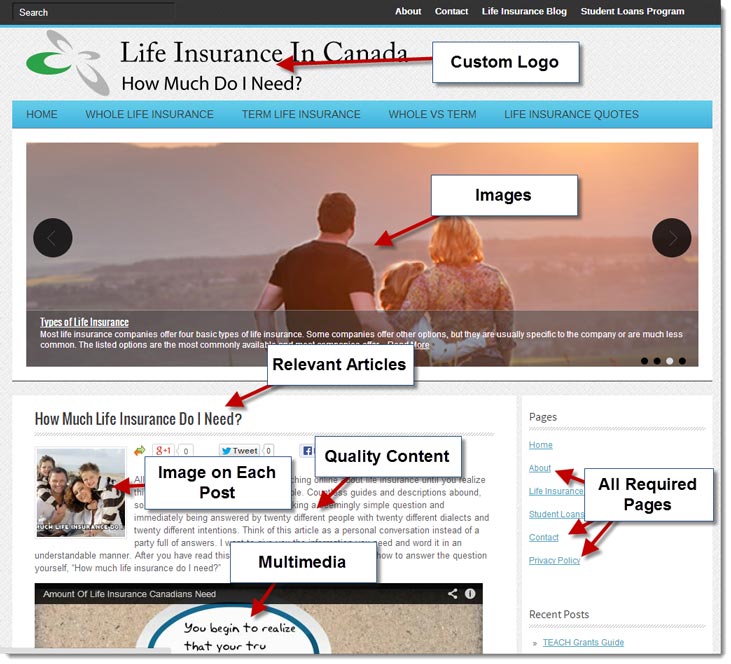
“Now why is this a GOOD example?”
Even at first glance, the website looks trustable and has a lot of authority.
- Custom WP theme
- Custom header image
- Relevant images in posts and homepage
- Privacy Policy and Disclaimer pages are present
- High-quality content
- Youtube videos
- Social links
A good question to ask yourself when deciding if your PBN will pass quality checks is…
“If I came across this website from a Google search, would I trust it?”
If the answer is yes, then you have done your job well (High Five)..
If not then keep reading and we will help you fix that.
How to create Quality Content
Look:
One of the biggest factors in making your PBN look legitimate will be the content on it.
But, before we create anything, we need to ask one important question…
“What topic will the articles be on?”
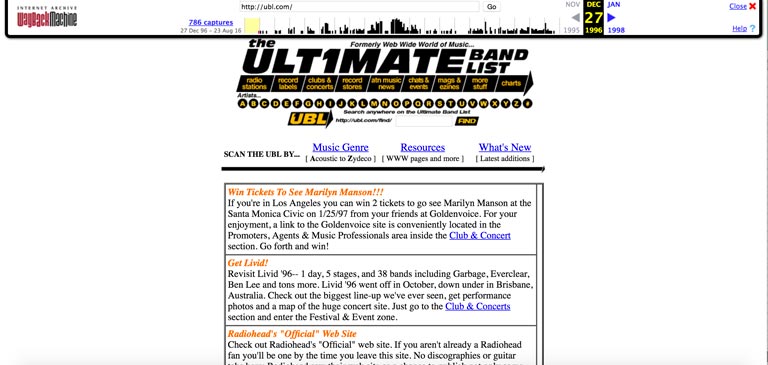
Head over to https://archive.org/web/
and enter the URL of the website you just bought.
It will give you a historical cache of what the website used to look like and what kind of articles were on there.
Using this information, you now have the topic of your articles.
Here is an example of what you will see:
Now that you have the topic..
Next:
You need to create content for your PBN!
If your writing ability is that great then..
You can find good freelance quality writers who can get the job done for you.
How to outsource content creation?
There are many different methods to outsource content creation, but it depends on the quality and quantity of articles you need..
If you are creating a network of more than 50 sites,
..then hiring a full-time worker on upwork.com or odesk.com may be a better option and Jon Haver has a very good guide on this here.
But for this post, I am assuming that you are just starting and the need for full-time high quality writer is not required.
You want to make sure you have at least 5 articles per PBN site.
Personally, I recommend iwriter because of their STUNNING turnaround time and high-quality articles.
But WAIT!
There are many people who may end up giving you spun, low-quality content so make sure you follow the instructions below to ensure you only get high-quality articles!
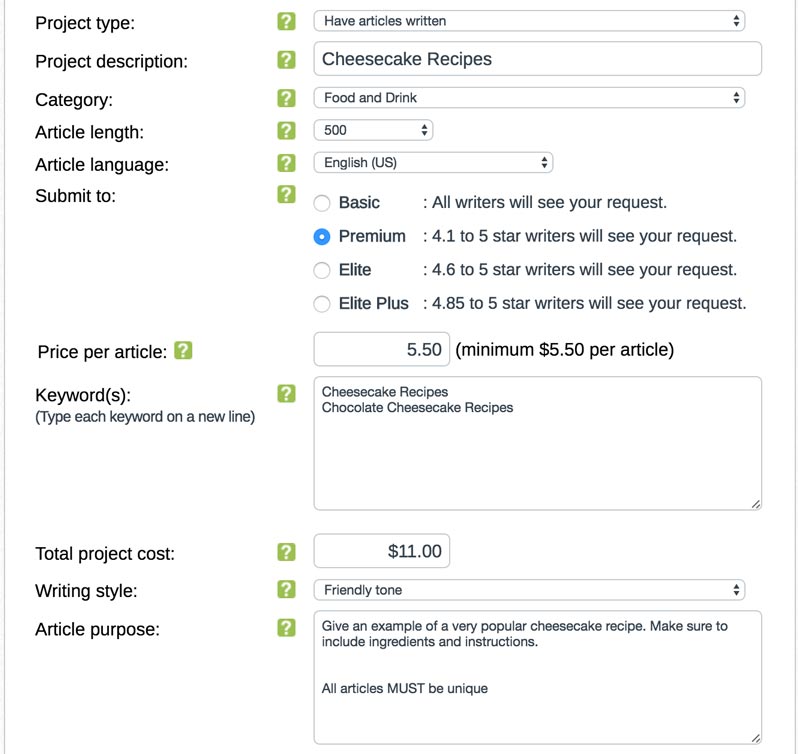
In order to ensure that you only get quality articles, follow the instructions below.
- Click on get content in the top menu
- Enter a description
- Enter a category
- Select length (500-1200 words)
- Submit to ONLY Premium Writers or above
a. This one is important, if you don’t select at least premium writers, you will get low quality spun content. While premium is more expensive, it is well worth it in the long run. - Enter your price
a. Usually, the minimum works fine - Enter relevant keywords
- Select writing style
Here is a screenshot with an example for “cheesecake recipes.”
While iwriter is my favorite place to get articles, there are many other places that you can test out to perhaps get cheaper articles.
Places such as Warrior For Hire and Blackhatworld Content Writing
May have better prices, but you will have to do your research on finding a reliable writer.
How to setup WordPress
Once you have your high authority domains and content for it, the next step would be to install WordPress.
Installing WordPress is very easy on many hosts. Most hosts use cPanel, so we will cover that here. If you used GoPBN, well then you don’t have to do anything but pick WordPress as your CMS.
Head to your cPanel Account
Look for your One-Click Installer and boom!
See the screenshots below for reference.
 After you click on “Wordpress” in the above picture, it should be pretty self-explanatory.
After you have setup WordPress, the next step would to install a free theme.
Now most people buy paid themes from themefores.com but don’t realize that there are THOUSANDS of free themes available from WordPress themselves.
You can access these by logging into your admin panel and then going to “Appearance,” “Themes,” “Add New,” and then “Search.”
See the following screenshot for example.
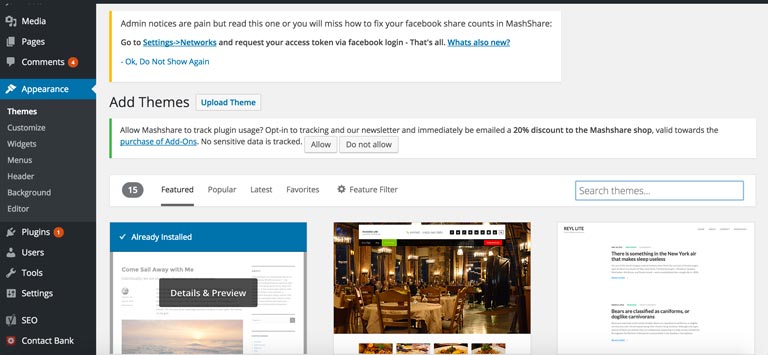
Now, all you have to do is search according to the colors, number of columns, and industry. Once you find a theme you like, go ahead and install and activate it.
Header Image
After a theme has been installed, you should have a basic website up on the domain. Now to make this look like a legitimate authority site, you need to make sure you have a good header image.
Personally, the best place to get custom images for free would be at Fiverr
I use Fiverr for all my personal PBNs as there are very talented graphic designers that will make AMAZING logos for $5.00.
This is my recommended Fiverr gig
“What if I am on a budget?”
Very well, we understand that not everyone has a lot of money to drop on header images so you can use Buffer Pablo as a free online tool to create headers.
Now, of course, these are not high-quality images made by a graphic designer, but they will be good enough for your PBN.
Once get the header images, you can go ahead and upload it to your PBN site by going to “Appearance” and then “Settings.”
WordPress Settings
Now we are not exactly done just yet, to ensure Google doesn’t pick up your network as “spam”, there are a few basic WordPress settings you can change to make the site look more natural.
“Now remember the web archive from the previous steps?”
Using the information on Wayback, you can make sure that the title and tagline are similar but not the same.
General Settings
- Title
- Tagline
- Description should be similar to what you found on Wayback machine
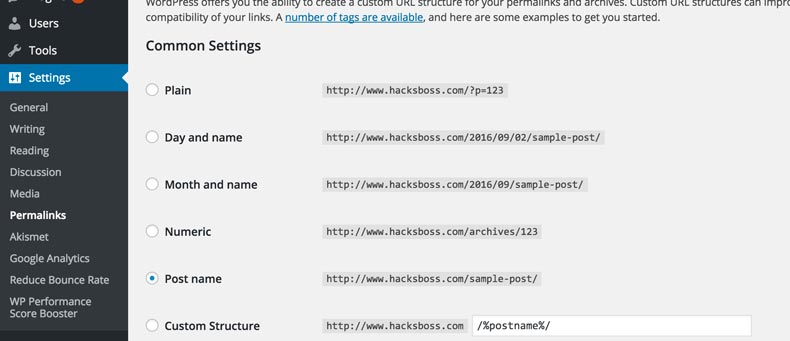
The next step would be to make sure that your permalinks are optimized for SEO.
By default, WordPress has your settings set up so that the link to a post/page looks like http://yoursite.com/postid?=2
Now that doesn’t look good for SEO purposes because it doesn’t show google what your page is about.
We want to change the structure so that it looks like http://yoursite.com/category/your-post-name
To do that follow the instructions below:
Permalinks
- Make sure you change your permalink settings to “/%postname%/”– Screenshot below for reference:
Okay, now that you have fixed your permalinks and general settings, what’s next?
We need to make our site look like a valid authority in the niche, so to do this we need to install a few WordPress plugins.
We can begin with installing a good SEO plugin because it helps with the on-site optimization.
For all the plugins listed below, make sure you diversify the plugins used on each PBN if you are building multiple. This ensures that there is no footprint and Google cannot pickup your website as spam.
SEO Plugin
Install a basic SEO plugin such as one of the following.
- Yoast SEO
- All in one SEO
- WordPress SEO
- Platinum SEO Pack
- There are a many more, don’t be afraid to experiment!
- If you get stuck,
Check out hermesthemes for a tutorial!
Make sure you switch around the plugins for every site. You do not want the exact same plugins on all your PBN sites because that becomes a footprint. If you need a refresh on footprints, read this blog post on PBN Footprints by our CEO.
Now we need something that creates a sitemap you can submit to google to help with a quick indexing of your pages/posts.
“What is a sitemap?”
Well, a sitemap is an xml file which contains all the pages on your website in one easy to access location. Google uses sitemaps to check when a website is updated and to see which pages to index.
Sitemap Plugin
- Sitemaps are very useful for Google because it is basically a directory of all the pages on your site.
- Helps Google index your pages faster
- Use any one of the following sitemap plugins:
- Google Sitemap Generator
- WP Realtime Sitemap
- Simple Sitemap
- Search for “sitemap” in the plugins section of WordPress, there are MANY options!
Check out this youtube video for a tutorial:
Now that the sitemap is created..
..we will need to make sure that we have a privacy policy on our website.
These are HUGE to Google because every single authority website you go on will have some sort of disclaimer or privacy policy.
Now making one of these isn’t hard, there are many free templates and generators online.
The one I use can be found below
Privacy Policy
Copy/Paste the privacy policy from Serprank’s Privay Policy Generator into a new page on your site..
“What kind of authority site doesn’t have a social presence?”
NONE! So we need to make sure that our network sites all have accounts on Facebook, Twitter, Instagram and Youtube.
Social Settings
Once you have created an account at the following sites, install a social plugin on WordPress
- Social Toolbar
- Sharebar
- You can find more social plugins here (remember to mix up plugins)
Adding Content
Look:
If you followed our tutorial above..
then you should have about 5 high-quality articles by now for your website.
The next step would be to upload these articles to our website and make it look as natural as possible.
“How do I make my site look natural?”
That is a very good question and you should be fine if you follow the instructions below:
- Add multiple categories related to your site
- Link to other authority sites within your niche
- Link to other HUGE authority sites (Wikipedia, webmd, and so on…)
- Include images in every post
- Embed related Youtube videos
- Use subheadings
- Use Bullet points
- Use lists
If you have followed all the instructions correctly, then you should now have a PBN that looks like a natural authority.
Ask yourself, “If I came across this site on a Google Search, would I trust it?”
If you answered “yes,” then your job is done and you can continue with the tutorial.
If you answered “no,” then ask yourself “why?” and then fix it.
Adding Social Signals
You are almost done with the PBN setup!
All that is left is to drip feed some social signals to your brand new private blog network.
Social signals are very important in SEO today because it shows how “POPULAR” a site is. The better the content on our website, the more it gets shared, liked, and commented on.
If you go on an authority website like CNN or Huffingtonpost you will see that many of their posts get hundreds of shares, likes and comments.
This way, we can “encourage” Google into thinking that we have a lot of traffic by sending some drip fed social signals.
Since these will be directing to your PBN, buying social signals from fiverr should be just fine.
This is a gig I would recommend for social signals
Once you buy that gig, the social signals will be sent to your site over a period of 5-7 days.
If you have followed all the above steps, then CONGRATULATIONS!
You have official setup a private blog network that will pass any spam check from Google and will DOMINATE the SERPS for you!
We only have to do one more thing before our site starts ranking on page one!
Linking to Your Money Site
Congrats!
Now that you have your high authority PBN..
..all that is left is to link to your money site so that the link juice passes on and you start seeing increases in your SERPs.
As I have mentioned multiple times in this article, you want to make sure your site looks as natural as possible. In order to ensure this, make sure you follow the guidelines below:
- Not more than 10-15 OBL
- 1 link per PBN
- Link goes in the beginning or middle of article
- Don’t use too many exact match anchors
- Interlink to your website
- Use exact match anchor text on your PBN
If you follow the steps listed above, your links will look natural to Google and not throw up any red flags.
Conclusion
CONGRATULATIONS! You have officially made a PBN and linked it to your money site.
One thing to keep in mind is that you will need to build multiple private blog networks in order to have significant success with SEO.
Don’t just build one link and then say, “PBNs don’t work!”
It takes time and effort for your positions to rise in Google after adding a link, so make sure you are patient.
I hope you guys liked this guide and please do share on facebook, twitter, and youtube.
If you have any questions, leave a comment below, and I will do my best to help you out!